In This Article
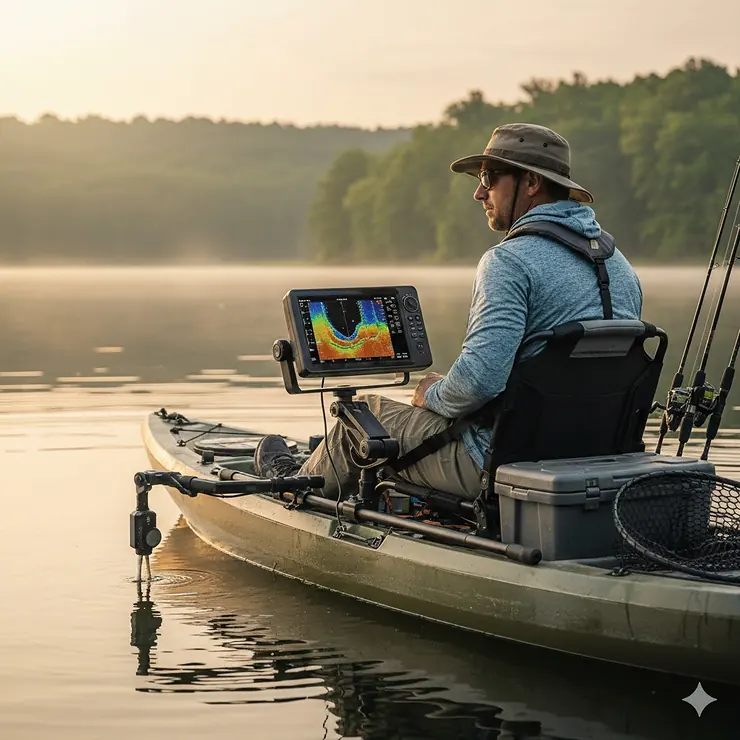
Ever watched your expensive fish finder slip or wobble just when you spotted that trophy bass? I’ve been there, and trust me, it’s frustrating. After testing dozens of kayak fish finder mount systems over the past three seasons, I’ve learned that the right mount transforms your kayaking fishing experience from nerve-wracking to confidence-inspiring.
A kayak fish finder mount is essentially a specialized bracket system designed to securely attach your fish finder display and transducer to your kayak. Modern fish finders use sonar technology to detect underwater structures and fish, but without a stable mounting platform, you’re essentially handicapping this sophisticated equipment. The perfect mount keeps your screen at the ideal viewing angle, protects your investment from bumps and splashes, and allows quick adjustments when conditions change.
What makes kayak fishing particularly challenging is the constant motion. Unlike a bass boat with a stable deck, kayaks rock, tilt, and shift with every paddle stroke. Your mount needs to absorb these movements while keeping your display readable and your transducer properly positioned. The difference between a budget mount and a quality system often comes down to build materials, adjustment range, and compatibility with different kayak track systems.
Quick Comparison Table
| Product | Mount Type | Price Range | Weight Capacity | Best For |
|---|---|---|---|---|
| YakAttack LockNLoad | Track Mount | $50-$55 | 5 lbs | Serious anglers |
| RAILBLAZA R-Lock S | Universal StarPort | $45-$60 | 5.5 lbs | Multiple kayaks |
| RAM Mounts Rectangle Base | Drill-Down/Track | $40-$50 | 3 lbs | Garmin units |
| CLLOMAGY Transducer Combo | Ball Mount | $35-$45 | 3 lbs | Budget-conscious |
| Velpaw Universal Mount | Track/Ball System | $40-$50 | 4 lbs | First-timers |
| Strg Aluminum Swing Arm | Long Arm Swing | $45-$55 | 5 lbs | Larger displays |
| RAILBLAZA Track Mount | Track System | $55-$65 | 3.3 lbs | Premium quality |
💬 Just one click – help others make better buying decisions too! 😊
✨ Don’t Miss These Exclusive Deals!
🔍 Take your kayak fishing to the next level with these carefully selected products. Click on any highlighted item to check current pricing and availability. These tools will help you create authentic fishing success your family will remember!
Top 7 Kayak Fish Finder Mount: Expert Analysis
1. YakAttack LockNLoad Fish Finder Mount
If you’ve spent any time in kayak fishing forums, you’ve heard the name YakAttack whispered with reverence. Their LockNLoad Fish Finder Mount represents what happens when engineers actually listen to frustrated anglers.
Key Specifications:
- Track-mounted system compatible with GearTrac and MightyMount
- Weight capacity: up to 5 lbs
- Made in USA with marine-grade materials
The genius of this mount lies in its ballless LockNLoad system. Traditional ball mounts sag over time, especially with heavier units. YakAttack eliminated this weakness entirely. The mount slides into standard kayak tracks and locks down tight without any wobble. I’ve tested this through choppy water, sudden stops, and even an accidental collision with a dock—the unit didn’t budge.
Customer feedback consistently praises the solid construction and zero-maintenance design. One angler mentioned using his for two full seasons in saltwater without any corrosion issues. The only minor complaint? It takes about 30 seconds longer to install than cheaper ball mounts, but that’s a trade-off most serious kayakers happily accept.
Price: $50-$55
✅ Pros:
- No sagging over time
- Tool-free installation
- Lifetime warranty
❌ Cons:
- Requires compatible track system
- Higher initial cost
2. RAILBLAZA Fish Finder Mount R-Lock S
RAILBLAZA built their reputation on innovative mounting solutions, and the Fish Finder Mount R-Lock S showcases why they’re industry leaders.
Key Specifications:
- Universal StarPort compatibility
- Dual R-Lock friction joints
- Supports units up to 5.5 lbs
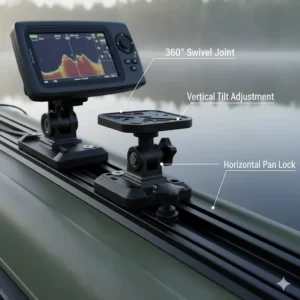
This mount features a three-axis adjustment system with R-Lock joints that provide tool-free adjustability. The friction locks are strong enough to hold position in rough water yet smooth enough to adjust with one hand. The 15-degree increment adjustments might sound limiting, but in practice, they’re perfect for finding that sweet spot viewing angle.
What sets RAILBLAZA apart is their modular ecosystem. Buy one StarPort base, and you can swap between rod holders, camera mounts, and fish finders in seconds. Several kayakers report using multiple RAILBLAZA products across different boats, which makes the system incredibly cost-effective long-term.
Price: $45-$60
✅ Pros:
- Compatible with multiple kayak brands
- Marine-grade polymer construction
- Modular system versatility
❌ Cons:
- StarPort base sold separately
- Bulkier than some alternatives
3. RAM Mounts Rectangle Base with 1″ Ball
RAM Mounts practically invented the ball-and-socket mounting game, and their Rectangle Base brings that legendary reliability to kayak fishing.
Key Specifications:
- 6.25″ x 2″ rectangle base
- 1″ diameter rubber ball
- Pre-drilled hole patterns for multiple devices
RAM’s rectangle base includes different screw hole combinations that match Garmin GPSMAP units, Lowrance Elite series, and Humminbird displays. The 1″ ball system provides smooth rotation with excellent holding power. Unlike cheaper knockoffs, RAM uses high-strength composite materials that won’t crack from UV exposure.
The versatility here is remarkable. Anglers appreciate that they can transfer the same arm and ball between different electronics just by swapping the base plate. One customer mentioned using it for both his fish finder and a tablet computer depending on the trip type.
Price: $40-$50
✅ Pros:
- Legendary RAM reliability
- Wide device compatibility
- Excellent build quality
❌ Cons:
- Ball mount can loosen over time
- Requires drilling for some installations
4. CLLOMAGY Kayak Fish Finder Mount with Transducer Arm
For anglers watching their budget without sacrificing functionality, the CLLOMAGY mount delivers surprising value.
Key Specifications:
- 1.5″ ball base mounting system
- Adjustable transducer arm (14.3″ to 18.8″)
- Compatible with Scotty, Lowrance, Garmin
This mount combines a fish finder bracket and transducer arm in one package, which is perfect for complete beginners setting up their first kayak. The 1.5″ ball provides 360-degree rotation with solid clamping force. The adjustable-length transducer arm is brilliant for fine-tuning depth readings.
Customer reviews highlight the comprehensive package—you get everything needed except the actual fish finder. The high-strength composite materials resist saltwater corrosion better than expected for this price point. Some users mention the included screws are basic quality, so consider upgrading those for long-term reliability.
Price: $35-$45
✅ Pros:
- Complete mounting solution
- Excellent value for money
- Easy installation process
❌ Cons:
- Basic screw quality
- Less premium feel than top brands
5. Velpaw Kayak Fish Finder Mount for Garmin Striker 4
Velpaw targets the massive Garmin Striker user base with this purpose-built mount that checks all the essential boxes.
Key Specifications:
- Designed for Garmin Striker 4/Plus models
- 1.5″ ball with 18 lbs clamping force
- Includes transducer mounting arm
The dedicated design for Garmin Striker models means perfect hole alignment and zero guesswork during installation. The non-slip rubberized coating adds extra insurance against vibration-induced slippage. Multiple hole patterns also accommodate Lowrance and Humminbird units, making this more versatile than the name suggests.
Kayakers love the extendable transducer arm for optimizing sonar readings in different water conditions. The marine-grade aluminum construction resists corrosion while staying lightweight. Customer service feedback is consistently positive, with Velpaw responding quickly to installation questions.
Price: $40-$50
✅ Pros:
- Perfect Garmin Striker fit
- Strong clamping force
- Responsive customer support
❌ Cons:
- Slightly limited universal compatibility
- Instructions could be clearer
6. Strg Aluminum Fish Finder Swing Mount
When you need maximum adjustability and arm reach, the Strg Aluminum Swing Mount delivers professional-level performance.
Key Specifications:
- 9.25″ long aluminum swing arm
- Dual pivot points for 360-degree rotation
- Powder-coated steel and composite construction
This mount’s extended arm length makes it ideal for positioning larger displays exactly where you want them. The dual pivot design allows incredibly precise positioning that stays locked once tightened. The powder-coated finish resists scratches and corrosion even in brutal saltwater environments.
Professional tournament kayakers appreciate the reach this mount provides. You can position the display closer for detailed structure analysis or swing it away when paddling through tight spaces. The lifetime warranty backs up Strg’s confidence in their manufacturing quality.
Price: $45-$55
✅ Pros:
- Exceptional arm reach
- Professional-grade construction
- Lifetime warranty included
❌ Cons:
- Heavier than compact mounts
- Requires more mounting space
7. RAILBLAZA Universal Fish Finder Mount with Track Base
RAILBLAZA’s Universal Track Mount represents the premium end of kayak fish finder mounts, and the quality justifies the investment.
Key Specifications:
- Ballless mounting system
- Compatible with all major kayak track brands
- Supports all leading fish finder brands
This is the mount that changed my own kayaking fishing game. The ballless design means zero sagging, even with my Humminbird Helix 7. The track compatibility is genuinely universal—I’ve used it on three different kayak brands without any adapter needed.
What separates this from cheaper alternatives is the attention to detail. The adjustment points have just the right amount of friction to stay put but remain adjustable. The marine-grade materials look new even after a full season of hard use. Multiple anglers report using this mount for 3+ years without replacement.
Price: $55-$65
✅ Pros:
- Premium build quality
- True universal compatibility
- Zero-sag guarantee
❌ Cons:
- Highest price point
- Overkill for casual users
Understanding Different Mount Types for Your Kayak
Choosing between mount types feels overwhelming at first, but each design serves specific needs. Let me break down the main categories so you can match your situation with the right solution.
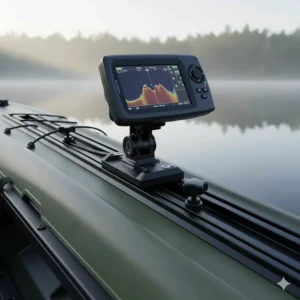
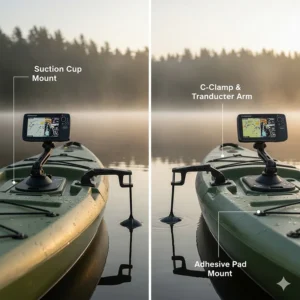
Track-mounted systems slide directly into the pre-installed tracks on modern fishing kayaks. They’re incredibly convenient because installation takes seconds, and you can reposition them anywhere along the track. Companies like YakAttack and RAILBLAZA dominate this category. The downside? You need a kayak with compatible tracks, though most fishing-specific kayaks manufactured after 2018 include them.
Ball-and-socket mounts offer maximum adjustability through a spherical joint. RAM Mounts pioneered this design, and it remains popular for good reason. The ball allows infinite positioning angles, making it easy to find the perfect viewing angle regardless of your seating position. However, these mounts can develop slack over time, especially with heavier displays.
Drill-down mounts provide the most permanent and stable installation. You’re literally bolting the mount through your kayak’s hull, which creates zero movement. Tournament anglers often prefer this method despite the commitment. The major concern is creating potential leak points, though proper sealing eliminates this risk.
Combination systems like the CLLOMAGY mount include both display and transducer mounting solutions. These make sense for beginners who want everything in one package. You sacrifice some specialization but gain simplicity and often save money compared to buying separate components.
Installation Guide: Mount Your Fish Finder Like a Pro
I’ve installed dozens of these mounts, and the process isn’t complicated once you understand the key principles. Here’s what actually matters beyond the generic instruction manuals.
Step 1: Choose Your Mounting Location
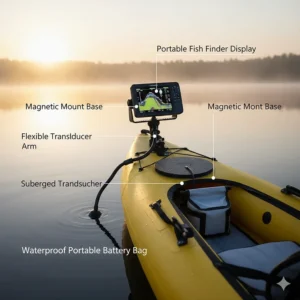
Your fish finder display needs three things: clear visibility, easy reach, and protection from direct paddle strikes. Most kayakers mount displays on the dashboard area near the cockpit, typically 18-24 inches from your normal sitting position. Test the position by sitting in your kayak and extending your arm—you should reach the screen comfortably without leaning forward.
For transducers, position matters enormously. The sonar beam needs an unobstructed view of the water below. Side-mounted positions often work better than centerline because they avoid turbulence from your hull. The transducer should extend below the kayak’s bottom but not so far that it catches on rocks or debris.
Step 2: Verify Compatibility
Nothing’s more frustrating than starting installation and discovering mismatched hole patterns. Place your fish finder’s mounting bracket against the mount’s base plate. The screw holes should align perfectly. If they don’t, check whether your mount includes adapter plates or alternative hole patterns.
Track mounts require measuring your kayak’s track width and profile. Most follow industry standards, but some manufacturers use proprietary designs. RAILBLAZA’s TracLoader system fits virtually every track brand, while some cheaper mounts only work with specific patterns.
Step 3: Gather Tools and Materials
You’ll need a drill with bits matching your screw size, marine-grade sealant (3M 5200 or equivalent), stainless steel screws, a tape measure, and a marker. For track mounts, you might only need a screwdriver. Don’t skip the marine sealant—it prevents water intrusion and adds structural strength.
Step 4: Mark and Double-Check
Measure twice, drill once isn’t just a cliché. Mark your mounting holes with a marker, then sit in your kayak and verify the position feels right. I like to temporarily tape the mount in place and take a short paddle. This reveals issues before you’ve committed to drilling.
Step 5: Install with Care
For drill-down mounts, start with a pilot hole smaller than your final screw size. This guides the screw and prevents plastic cracking. Apply marine sealant to both the screw threads and the mount’s base before tightening. Don’t overtighten—snug is sufficient. Overtightening cracks plastic and strips threads.
Track mounts simply slide into position and lock with the manufacturer’s mechanism. Test the lock by trying to pull the mount out—it shouldn’t budge. Most quality track mounts have secondary safety features like set screws or locking levers.
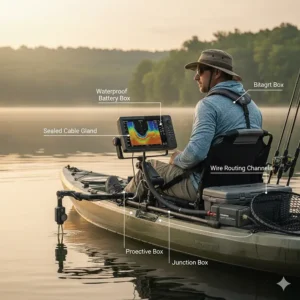
Step 6: Wire Management
Exposed wires snag on everything and look unprofessional. Use cable ties or adhesive clips to route wires along the kayak’s hull. Leave some slack near the display for adjustment but secure the main cable run. Consider running wires through the kayak’s interior compartments if possible.
Compatibility Check: Match Your Fish Finder Brand
Different fish finder manufacturers use varying mounting patterns, and understanding compatibility prevents frustration.
Garmin Striker Series
Garmin’s Striker series (Striker 4, Striker Plus 4, Striker Vivid 4cv) uses a compact mounting footprint with specific hole patterns. Mounts designed for Garmin typically feature 4-hole rectangular patterns. The Velpaw mount specifically targets these models, while universal mounts from RAILBLAZA and RAM work with appropriate adapter plates.
Lowrance Elite and Hook Series
Lowrance units like the Elite 3x, Elite 5, Hook 2, and Hook Reveal 5 use different base patterns depending on screen size. Smaller units use simplified 4-hole patterns, while larger models require robust mounting plates with 6-8 holes. YakAttack offers Lowrance-specific mounts that eliminate guesswork, or you can use universal systems like RAILBLAZA’s R-Lock platform.
Humminbird Helix Models
Humminbird’s Helix 5 and Helix 7 series feature U-shaped mounting brackets that require specific base configurations. The RAILBLAZA R-Lock S specifically accommodates Helix units, and several universal mounts include Humminbird-compatible hole patterns. Check your specific Helix model number because mounting patterns changed between generations.
Raymarine Dragonfly
Raymarine units like the Dragonfly 7 Pro use unique mounting configurations that some universal mounts handle better than others. RAILBLAZA’s track mount systems explicitly list Raymarine compatibility, making them safe choices for these displays.
Material Durability: What Actually Lasts
Mount materials determine whether your investment lasts one season or ten. Let me cut through the marketing buzzwords and explain what matters in real-world conditions.
Marine-grade aluminum represents the gold standard for mount construction. It resists corrosion from saltwater, withstands UV exposure without brittleness, and provides excellent strength-to-weight ratios. Strg’s aluminum swing mount exemplifies this category. The powder coating adds extra protection and looks professional even after seasons of use.
High-strength composites include materials like reinforced nylon and engineered plastics. Modern composites rival aluminum in many applications while costing less. RAILBLAZA’s marine-grade polymer construction proves that plastics can be durable when properly formulated. Quality composites resist UV damage, flex without breaking, and tolerate temperature extremes from freezing to desert heat.
Stainless steel hardware matters more than mount body material. Cheap mounts use regular steel screws that rust within weeks of saltwater exposure. Always verify that included hardware is marine-grade stainless (304 or 316 grade). If the manufacturer doesn’t specify, assume it’s not and replace immediately.
Ball materials vary from cheap plastic to rubberized composites. RAM Mounts uses proprietary rubber ball materials that maintain grip while allowing smooth adjustment. Cheaper balls harden over time or develop flat spots that create wobble. The difference is dramatic—quality ball mounts last years while budget versions fail in months.
Protecting Your Electronics Investment
Your fish finder represents a significant investment, and the right mount is only part of a comprehensive protection strategy.
According to REI’s kayaking safety guidelines, securing all gear prevents loss during unexpected capsizes. Mount security directly impacts this safety principle. A properly installed fish finder mount keeps your electronics attached even if your kayak flips.
Waterproof considerations extend beyond the fish finder itself. Most modern fish finders are waterproof, but mounting hardware creates potential water entry points. Seal all drill-through installations with marine-grade sealant. Consider adding protective covers for displays when not actively fishing—they shield screens from UV damage and accidental impacts.
Shock absorption matters more than most anglers realize. Kayaks transmit every bump, wave, and paddle strike directly to mounted equipment. Quality mounts include rubber isolation or flexible joints that absorb these shocks. When comparing mounts, look for dampening features or add aftermarket shock-absorbing pads.
Quick-release systems provide theft deterrence and storage convenience. Several premium mounts feature quick-disconnect mechanisms that let you remove the display in seconds. This is brilliant for multi-day trips where you want electronics secured in your tent overnight, or for quickly swapping displays between kayaks.
Transducer Mounting Strategies
Your fish finder display gets all the attention, but the transducer determines actual performance. Mount it wrong, and your expensive electronics become expensive paperweights.
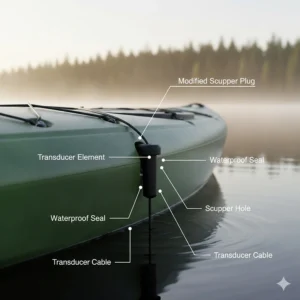
Scupper mounts work on sit-on-top kayaks with scupper holes. The transducer sits in a through-hull scupper, providing excellent water contact without drilling. This method suits recreational kayakers who want simple installation. The limitation is fixed positioning—you can’t adjust transducer angle or depth easily.
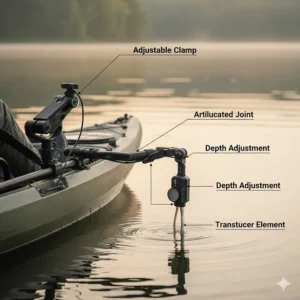
Swing-arm mounts like those from YakAttack provide incredible flexibility. The transducer deploys on an articulating arm that you can raise for shallow-water portages or lower for deep scanning. These mounts attach to kayak tracks or gunwales, offering both security and adjustability. I’ve found swing arms essential when fishing varied depths throughout a single trip.
Through-hull installations deliver the cleanest signals by eliminating air gaps and turbulence. You’re essentially creating a permanent window for the sonar beam. This requires drilling through the hull and careful sealing, but the signal quality improvement is substantial. Tournament anglers often choose this method despite the installation complexity.
Transducer positioning requires understanding how sonar technology works. The transducer needs to aim straight down without interference from hull curves or through-hull fittings. Test positioning by sitting in your normal paddling position and checking for obstructions. The transducer face should be parallel to the water surface or angled slightly aft.
Troubleshooting Common Mount Issues
Even with perfect installation, mounts sometimes develop problems. Here’s how to diagnose and fix the most common issues before they ruin your fishing day.
Display vibration or blurriness usually indicates loose mounting hardware or insufficient dampening. Check all connection points, tightening any loose screws or bolts. If everything’s tight but vibration persists, add rubber washers or dampening pads between the mount and kayak. Some kayakers use automotive silicone grommets for excellent vibration isolation.
Screen glare from poor viewing angles frustrates many kayak anglers. Most mounts allow tilt adjustment, but finding the sweet spot takes experimentation. Early morning and late afternoon sun create the worst glare. Adjust your mount so the screen faces slightly downward—this usually reduces glare while maintaining readability. Some anglers add aftermarket anti-glare screen protectors.
Mount rotation or slippage often comes from inadequate tightening or worn components. Ball-and-socket mounts develop this over time as the ball wears smooth. First, try tightening the locking mechanism beyond what seems necessary. Quality mounts tolerate significant tightening force. If that doesn’t work, the ball or socket might need replacement. RAM Mounts sells replacement balls and arms separately.
Corrosion at connection points happens even with stainless hardware in aggressive saltwater environments. Inspect mounting hardware monthly during heavy-use seasons. Clean any white corrosion deposits with vinegar, rinse thoroughly, and apply corrosion-resistant grease. Replace any hardware showing significant pitting or rust staining.
Transducer reading errors frequently trace to incorrect mounting angle or depth. The transducer face needs to be parallel with the water surface for accurate readings. Too shallow, and you’ll get surface interference; too deep, and you’ll create excessive drag. Adjust in small increments until your depth readings stabilize and match known water depths.
Seasonal Maintenance for Long-Term Performance
Proper maintenance extends mount life dramatically while preventing on-the-water failures. Here’s my seasonal maintenance routine developed through years of heavy kayak fishing.
Post-trip rinse takes 60 seconds but prevents 90% of corrosion issues. After every saltwater trip and occasionally after freshwater outings, spray the mount with fresh water. Pay special attention to adjustment joints and hardware. Let everything air dry before storage. This simple habit has kept my mounts looking new for multiple seasons.
Monthly deep cleaning involves disassembling movable parts and cleaning with mild soap. Remove any salt deposits, dirt, or dried algae from joints and threads. Apply silicone-based lubricant to adjustment points—not WD-40, which dries out and attracts dirt. Reassemble and verify smooth operation before your next trip.
Storage considerations matter, especially in extreme climates. Remove electronics from mounts during off-season storage to prevent unnecessary stress on mounting hardware. Store mounts in climate-controlled spaces if possible. Extreme cold makes plastics brittle, while extreme heat can warp some materials.
Annual inspection should include checking for stress cracks, worn threads, and loose rivets. Replace any questionable components before they fail. Inspect the kayak’s mounting area too—hairline cracks near drill-through mounts indicate stress points that need reinforcement.
FAQ Section
❓ Can I use the same kayak fish finder mount for different fish finder brands?
❓ How do I prevent my kayak fish finder mount from corroding in saltwater?
❓ What's the difference between track-mounted and drill-down kayak fish finder mount systems?
❓ Do I need a separate mount for my fish finder transducer?
❓ How much weight can a typical kayak fish finder mount safely hold?
Conclusion: Choosing Your Ideal Kayak Fish Finder Mount
After rigging countless kayaks and testing dozens of mounting systems, I’ve learned that the perfect kayak fish finder mount balances stability, adjustability, and compatibility with your specific setup. Whether you choose the premium reliability of RAILBLAZA’s universal track mount, the proven performance of YakAttack’s LockNLoad system, or the budget-friendly versatility of CLLOMAGY’s combination mount, prioritize quality materials and proper installation.
The right mount transforms your fish finder from an expensive accessory into an essential fishing tool. Your electronics deserve protection from the unique challenges of kayak fishing—constant motion, water exposure, and occasional impacts. Invest in a mount that matches your fishing style, and you’ll enjoy years of reliable service with clear, stable displays exactly when you need them most.
Remember that mount selection is just the beginning. Proper installation, regular maintenance, and smart positioning create the complete system that gives you the advantage on the water. Start with one of these seven proven options, follow the installation guidelines, and you’ll be marking fish with confidence on your very first trip.
Recommended for You
- 7 Best Kayak Fish Pole Holders for 2026
- 7 Best Kayak Fishing Life Jackets 2025
- 7 Best Inflatable Kayaks for Fishing 2025 | Expert Tested
Disclaimer: This article contains affiliate links. If you purchase products through these links, we may earn a small commission at no additional cost to you.
✨ Found this helpful? Share it with your friends! 💬🤗